A centrifugal pump is used in large number on board ship and every marine engineer should know how to overhaul the centrifugal pump. Centrifugal pumps are mostly preferred because their outflow is large as compare to other pumps and their maintenance is less. But the pressure developed from this type of pump is not that much and reciprocating pumps come into play when pressure requirements are large. In this article I first discuss about the centrifugal pump and then, the procedure of overhauling the same.
What is a Centrifugal Pump?
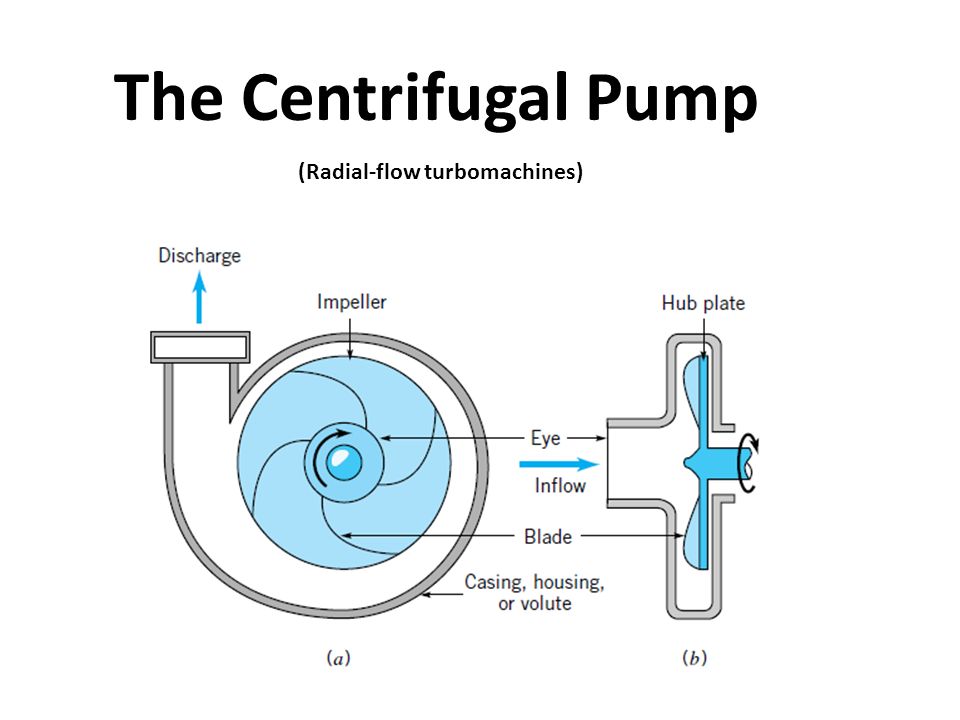
I will explain the centrifugal pump in brief only. If you want to know in more detail about this pump, then you can go to this page. Centrifugal pump has a casing and impeller. This impeller usually gets derived from the electric motors. Impellers is responsible for giving pressure to the fluid and take fluid from one end and transmits it with pressure to the other end. Below diagrams shows the explanation of how a centrifugal pump looks. Usually the sealing ring between the motor shaft and pump casing tends to leak out and also the ‘Wear rings’ fitted on the centrifugal pump gets wear and tear in the course of time. So in order to troubleshoot these defects we do the overhauling of centrifugal pumps.

Procedure of overhauling centrifugal Pump or compressors
I have explained the whole procedure in points to make it simpler to understand.
1) First of all before overhauling centrifugal pump, all the spare parts are checked for availability like the Wear rings, mechanical seal etc. All the power supply to this pumps should be removed and a notice stating the ‘machine is under maintenance’ need to be hanged.
2) Now drain the pump completely and collect all the tools and check them if they are in good condition or not. Before opening the coupling, a mark between the coupling and casing should be made so that in future there is no problem with the alignment.
3) Now remove the coupling and free the pump from the motor and use the “Jack-Bolts” for parting the casing half. Now open the casing and slowly lift it up with the help of crane.Note: In some cases there is no need to part the casing. After motor has been removed, tight the slings to the rest of the shaft to remove the impeller which is attached to the remaining shaft.
4) Now remove the gland packing or mechanical seal and check, and straight away replace this. Also install a new wear ring and check other fittings.
5) Now assemble the pump shaft with new wear rings, mechanical seal and bearing bush. Avoid any dirt accumulating on the pieces before fitting them because it will cause wear and tear.
6) Replace the pump shaft and impeller from casing and housing with respect to the markings.
7) Replace the joint between the mating surfaces and replace and tighten the hold bolts. Check that pump shaft is free to rotate.
8) Check the marking on coupling and fit bolts and again check the pump shaft is free to rotate. This is to ensure that pump will free at the time of starting. Now replace the power supply to the motor.
9) Now open the suction valve and prime the pump slowly and after priming open the discharge valve and start the pump.
10) After pump has started check if the pump is vibrating or not. After that check that the discharge pressure is good.
11) Now remove all the tools that are near to this pump and remove all the markings and notices.
12) Inform the concerned person about the completion of work and hand over the readings you took while starting the pump after overhauling.


Hello,
I have just overhauled a centrifugal pump, a main sea water pump. After assembly and installation the shaft is hard to rotate by hand. Initially it was free but after starting to try out it has become tight again cant be rotated by hand. Did not start again doubting it would overload the motor. What could be the issue? How do i make sure the alignment of the shaft is proper? All markings and punch marks are matching and perfectly as before dismantling.
Have you checked the cylinder bearing at the bottom? shaft goes inside that in some centrifugal pumps.